- Joined
- 31.10.19
- Messages
- 378
- Reaction score
- 833
- Points
- 93
Of course, you can also subscribe to a corresponding service but having SSH access to a computer with internet access means you can create your own VPN service without spending a penny. The main idea is to connect to a remote computer in a specific network and route all network traffic locally to that network. Let's learn how to create your own VPN service.
Preliminary preparation.
All you need is root access to both computers. You must install an SSH server on the remote computer. Of course, you will also need an SSH client. You will need to configure both the local and remote computers. I use KDE, so I use NetworkManager to make the necessary settings (but I can also do it the other way around). There are some specific settings that need to be done on the server but they are most likely already configured. The file /etc/ssh/sshd_config should contain the line PermitTunnel=yes. Additionally, you may need to set AllowTCPForwarding to Yes. The firewall may also require some configuration. And while setting up the NetworkManager plugin instructions will be helpful even for those who don't use the program.
Client-side settings.
If you are using NetworkManager you will need the appropriate plugin. For Neon and other Debian-based distributions the package network-manager-ssh is suitable. That's all you need. If you don't want to use NetworkManager you can use the following command:
ssh -f -v -o Tunnel=point-to-point -o ServerAliveInterval=10 -o TCPKeepAlive=yes -w 100:100 root@YOUR_SSH_SERVER \ '/sbin/ifconfig tun100 172.16.40.1 netmask 255.255.255.252 pointopoint 172.16.40.2' && \ /sbin/ifconfig tun100 172.16.40.2 netmask 255.255.255.252 pointopoint 172.16.40.1
Here we need root access to both systems because we are creating tunnels. Even with plugins, this can cause a few issues. Obviously, we don't want to be prompted for the SSH connection password constantly and have to verify the key. But you can address these issues by configuring the VPN manually.
Issues.
Most modern systems don't allow logging in as root using a password and sometimes don't allow connecting to the system in this mode at all. Therefore, we need to solve this problem first. Additionally, when NetworkManager starts SSH it looks for the root user's key instead of the regular user's key. If it couldn't find something - it would stop. So, we need to ensure smooth login as the root user. To allow root to log on to the server edit the /etc/ssh/sshd_config file and set PermitRootLogin to Yes. I recommend running in this mode only for the time it takes to complete the next steps of configuring the server. Then restart the sshd server using the following command:
systemctl restart sshd
You can also use the following command:
/etc/init.d/ssh restart
After logging in to the local computer using the standard account, you need to use ssh-copy-id to install the certificate on the host computer. Once this is done, you should return to the server and change the value of PermitRootLogin in /etc/ssh/sshd_config to prohibit passwords. This will allow you to connect to the server as the root user using a certificate instead of a password.
If you have already logged in as root, you may have already been asked if you want to accept the server key. If not, we have a problem. If possible, log in and answer Yes to the corresponding question and then the system will stop asking the question. Of course, if that isn't possible, we can address the issue by disabling StrictHostKeyChecking.
Theoretically, it's possible to pass additional ssh parameters to the NetworkManager plugin, but for some reason this approach doesn't work with the plugin version from the repositories. If you don't use the plugin and do everything manually, you can make the necessary settings yourself. SSH settings for the root user can be set in /root/.ssh/config. You can also set the global settings in /etc/ssh/ssh_config.
Host *.hackaday.com hackaday.com
StrictHostKeyChecking no
Tunnel yes
If you don't like host key validation - accept the remote key manually (or edit /root/.ssh/known_hosts manually).
Connecting.
Everything needs to be able to work now. If you are using the NetworkManager plugin, you will simply need to establish a new connection. That is, you will need to go into the VPN Connections subsection and select SSH.
*selecting the connection type
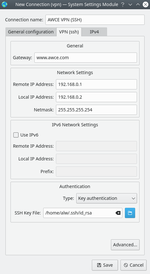
You need to specify the certificate that you want to use to log in to the remote system.
*configuring the connection
After saving the connection settings, this connection should be activated like any other network interface. If you want to try out your new VPN, first, as usual, check your IP address on a special site. After that, activate the VPN and find out your address again. If you are unable to establish a VPN connection, check the system log for information about errors produced by SSH.
Conclusion.
Of course, there are other VPN solutions out there. But it's almost guaranteed that the computer you are working with has an SSH server. So the recommended method of establishing a VPN connection via SSH is a simple and comfortable solution.
Last edited:


