- Joined
- 31.10.19
- Messages
- 1,318
- Reaction score
- 4,222
- Points
- 113

Using a personal computer today may not be as private as one might think, given the digital footprints left behind that can be discovered by others. The Tails operating system offers a comprehensive solution for maintaining anonymity and avoiding detection by those who might intrude on your privacy. Installing Tails involves a series of steps and begins with loading it onto a USB drive. The process requires downloading the Tails OS and software for creating a bootable USB. Following the installation, it’s necessary to reboot the computer with Tails and proceed with the setup instructions. For those needing to keep files on a long-term basis, Tails provides an option to set up persistent storage. Additionally, utilizing two USB drives enables the creation of a securely storage area.
What is Tails
Tails or The Amnesic Incognito Live System is one of most secure portable operating systems (OS). Developed based on Debian GNU/Linux, it protects you against surveillance, censorship, advertising, and viruses. Unlike typical operating systems like Windows, Linux, etc., that use the hard drive to boot, Tails starts using a USB drive and turns your computer into a secure system. Because of the protection it provides, it has widespread usage among many people who have a dire need of online privacy and security. Journalists and hackers are at the top among people who use it. The most controversial example is the NSA whistleblower Edward Snowden, who has claimed to have used Tails to leak secret files of the NSA.What is Tails
How Does Tails Work
Tails are installed on a USB drive to boot up the OS using the USB stick without using the machine’s hard disk. Thus, it is independent of the current OS installed in the machine. It encrypts your files and internet usage, and nothing gets saved on your HDD or SSD. So, after you shut down your computer, you will never leave any trace of anything you did or accessed on the machine you have the Tails USB plugged into.How Does Tails Work
Privacy
Tails uses a Tor network for all the internet activities encrypting and anonymizing your connection. Because of this, third parties will not know what websites you are visiting. Moreover, advertisers cannot learn about your browsing habits as Tor allows you to be anonymous and change your identity if you need. In addition, Tails provides a set of software applications like LibreOffice, where you can work on sensitive documents, OnionShare, Thunderbird, and many more.Persistent Storage
Once you are disconnected from Tails, everything you did disappears, including the saved files. But you have the option to save the files persistently in its persistent storage. Everything in the persistent storage will be encrypted with password protection making everything in it secured and anonymous. Now let’s see how to install Tails on a USB stick.
How to Install Tails on a USB
What are the system and device requirements?
How to Install Tails on a USB
What are the system and device requirements?
- A USB drive. You will need one USB drive to install Tails with at least 8GB of memory. Remember that you will lose all the data on your USB drive during the installation. Thus, make sure to use an empty USB drive.
- Your computer should have at least 2GB of RAM.
- About half an hour of your time to install Tails and time to download around 1.2 GB of data.
- Another device like a mobile phone, tablet, or another PC to read and follow these instructions while installing. You can also take a printout of this guide.
Downloading Tails
First, Download Tails from the official Tails website’s download page, selecting your operating system correctly. Downloading Tails
You can either directly download Tails from USB Image or download through BitTorrent, which will be much faster.
Verify Tails Download
After the download, if you downloaded directly, verify the download by clicking on ‘Verify Tails’. Then select the USB image you downloaded. After that, the page will run the check. This step ensures that the download is not a malicious tails USB image. Verification from the Tails page is based on a Javascript code embedded in the Tails download page. You do not need this step if you download through BitTorrent because BitTorrent will automatically verify the download using checksum. You will get the following successful verification notification if the verification is successful.Verify Tails Download
Download a USB installer
Next, you need to download a USB installer Etcher to write the Tails ISO image downloaded and create a bootable USB flash drive. Download a USB installer
Install Tails
Now we have all the things gathered to install Tails. Plug your USB device into your machine. Next, click on the downloaded Etcher installer to start Etcher.Install Tails
Step 1: Click the Select ‘Flash From file’ option. Then, select the Tails USB image, which should have a .img file extension that you downloaded earlier. You can also choose Flash from the URL option if you choose to download Tails from another mirror.
Step 2: Next, click on ‘Select Target.’ Etcher will list all the connected USB drives and automatically selects a USB stick.Select the USB drive you want to install Tails on from the list.
Step 3: Finally, click on ‘Flash!’. Etcher will Flash your USB drive with Tails on your selected USB, which should take only a few minutes. After the flashing completion, Fletcher will automatically validate the installation. Upon successful completion, it should display the following message. After that, close the Etcher window. Important: After you complete the installation, open this guide from another device because you won’t be able to access this when you run Tails.
Restart your computer on Tails
Restart your computer on Tails
- In windows, click on the Start button.
- Next, while selecting the Power -> Restart option, press and hold the Shift key, then you will get a window with options to select the ‘use a device.’ option. If you do not get this option, find the boot menu key according to your computer model and shut down the computer. For example:
Asus: Esc
Dell: F12
HP: F9
Lenovo: F12
MSI: F11
Samsung: Esc, F12, F2 - While you start the computer, press the boot menu key identified in step 2 immediately several times.
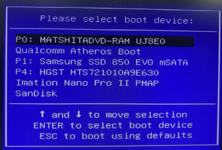
If the boot is successful, you will get the Boot Menu with a list of connected devices as in the above image. Then select your USB drive and press Enter. If it starts another OS installed on the computer, then restart it again as in step 3. If your machine successfully starts on Tails, you will get the boot loader on-screen, and Tails will automatically begin showing the welcome screen.
Configure and Start Tails
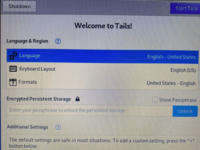
You need to configure language and region settings in the Tails welcome screen as shown in the following image and click on ‘start Tails.’ After a few seconds, you will get the Tails desktop.Configure and Start Tails
How to Connect to the Internet?
Now you have successfully connected with Tails OS. For secure browsing, you can enable wifi and use the Tor browser for web surfing. For that, open the settings menu in the top-right hand corner:How to Connect to the Internet?
Select the Wi-Fi Not Connected option and then select Network.
After selecting the correct wifi network, the Tor Connection screen appears to help you connect to the Tor network.
After successfully connecting to the Tor browser, you can safely surf the internet. If you want to send any saved files through email, you need to keep the files in the ‘Tor browser folder’. Otherwise, Tails doesn't allow you to access any file in the default home directory.
How to create persistent storage on Tails?
Everything you save inside Tails will vanish after you have shut it down. Thus, you can create persistent storage if you need to keep them persistently.- Click on the applications menu in the top-left corner and choose ‘configure persistent volume’. Then you will get the following persistent volume setup window.
- Insert and verify a passphrase according to the requirements.
- Click on the Create button, and Tails will give you a list of features of Persistent Storage. Select only the features that you require.
- Click Save.
- Shut down the computer and, as explained earlier, restart your Tails USB drive.
- This time, you will get the following welcome screen consisting of an option to input your persistent storage passphrase.
- Select your Language & Region settings.
- In the Encrypted Persistent Storage input box, enter the passphrase you have configured earlier and unlock the Persistent Storage for the current working session.
- Click on Start Tails. Within a few seconds, you will get the Tails desktop.
How to Install Tails on Two USBs?
You can also use two USBs to install and run Tails. Using two USBs is to use the Tail installer for incremental updates and create a secure encrypted persistent storage. You can use just one USB drive if you do not need encrypted storage. For this, you need two USB drives of at least 4GB of storage each. Install Tails as described above on the first USB.
Create the Second USB
Create the Second USB
- After installing the first USB, plug in the second USB and restart your computer with Tails. Select Tails from the boot menu.
- Then, after the Tails welcome screen appears, select the language and region and start Tails. Within a few seconds, The Tails desktop will appear. At this time, Insert your second USB.
- Finally, open the “Applications” menu in the upper-left corner of the desktop. Next, click on “Tails” -> “Tails Installer”.
- Choose the first option, “Clone the current Tails”. Once you click it, you’ll be able to select your second USB from target USB sticks and confirm the installation.
- After the installation completes, you’ll have another Tails USB.
- Remove the first USB, and restart the PC back on the second USBTails. You’ll see Tails starting on it successfully.
Summary
Tails are one of the most secure operating systems in the world. You can use it on any computer without your activities being tracked. Once installed, you can utilize its pre-installed software for all your anonymous activities, including the Tor browser, to connect to the internet. This article provided a step-by-step guide on installing and running Tails on a USB stick and how you can access the Tor network and create persistent storage.2024 Update: The details described in this guide remain unchanged and should be up to date. I would only like to address a few questions.
After installing tails on a USB, can the USB boot within a VM environment?
- The USB will boot on the machine you inserted the USB into. It can’t connect to a VM or a different server.
Is it possible to create only the persistent volume on a second USB?
- There is also no point in doing this, even if it would be possible. What you could simply do is copy all the files from the persistent volume onto a second USB and encrypt it. It’s the exact same thing. You can save the data from the persistent volume on any device you want, but you need to use maximum opsec protocols.
Frequently Asked Questions
Can you use Tails without a USB?
- You can also use a writable DVD. You can right-click on the Tails ISO image in windows, select ‘Burn Disk Image” and select the Disk burner drive. When rebooting the machine, select the appropriate DVD drive.Can you install Tails on a hard drive?
- Tails has been designed to run live on removable media like a USB or a writable DVD. Thus, it's not a recommended installation method.Is Tails traceable?
- Tails has a sound security system allowing you to leave no digital footprint on your activities. But there can be loopholes. For instance, you are using a weak password for persistent storage. Also, if you log in from Tails into some of your social media associated with your real identity, Tails will not protect you.
Last edited:


